Safety note: Don’t try this yourself. When overpressurized with water, PVC cracks. When overpressurized with highly energetic compressed gas, PVC shatters into potentially deadly projectiles. As a result, PVC should NEVER be used with compressed air.
For the past few years, I have built air-powered animated Halloween props. This is a prototype for a low-pressure, long-throw cylinder/actuator that might end up in a future design.
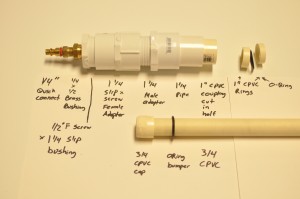
The basic idea here is that the 3/4″ piston will travel inside the 1 1/4″ pressure chamber.
I believe this design is somewhat novel in two ways:
1) The pressure chamber and piston are modular. This picture is showing a minimum-throw piston, but if you want say 18″ more throw, just extend the pressure chamber by making up an 18″ long section of 1 1/4″ pipe with a male adapter on one end and female on the other. Swap the piston with one that is 18″ longer, and you are good to go.
2) Even if you don’t care for the extensibility of the chamber, it is nice to be able to unscrew the 1 1/4″ section for maintenance of the O-ring.
A few key construction details:
1) Note the difference between CTS CPVC pipe and plain PVC pipe. CTS CPVC is yellowish, and uses copper pipe sizes. Regular PVC pipe is white uses a different sizing standard. Both are used here, and they can NOT be substituted.
2) The #212 O-ring fits perfectly between the 3/4″ CPVC pipe and the 1″ fitting, and is held in place by a couple of slivers of 1″ CPVC pipe.
3) The joint between 1-1/4 PVC pipe and 1″ CPVC coupling is very non-standard. The sizing happened to work out OK for me, but that may just be luck since neither the ID of the PVC, nor the OD of the CPVC coupling is standardized. In any event, I made this joint tight using polycaprolactone as an adhesive, using the technique outlined in my post Reversible, semi-permanent PVC glue joints and custom fittings. A construction adhesive like PL Premium might also have worked.
4) All other slip joints here are cemented with PVC glue, and all threaded connections are wrapped with teflon tape.


