Mounting a USB datastore in VSphere ESXi

When I first started working with VMWare VSphere ESXi, I was surprised to discover that it does not support mounting a USB drive as a datastore. OK, maybe not that surprised given EMC’s business model, but still…

My solution:

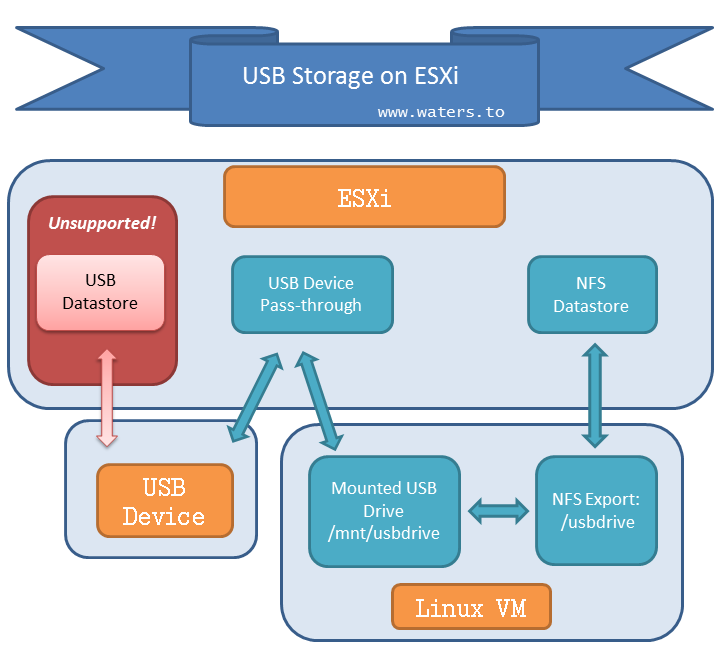
  1. Mount the disk in a helper VM
    • Create a helper VM running Linux
    • Configure the VM to pass the USB device through to the guest
    • Mount the USB device in linux, say in /mnt/usbdrive
  2. NFS Export the disk from the helper VM
    • Enable NFS in Linux (eg yum install nfs-utils)
    • Export the disk via a line in /etc/exports like:
      /usbdrive 1.2.3.4/32(rw,sync,no_root_squash)
  3. Mount the NFS storage in the hypervisor
    • Enable NFS in ESXi
    • Create a new datastore from network storage

USB Storage on VMWare Infographic

Caveats:

  • This configuration is best used for administrative tasks like backing up/restoring/moving VMs. I don’t recommend running a live VM in this configuration.
  • Due to the risk of deadlock, it is far better to put the helper VM on a different VSphere instance.
  • Make sure to remove the VSphere datastore before powering down the helper VM. If you don’t, the datastore will hang and can’t be removed until you reboot the hypervisor.

Tuning a Terastation 3400 for NFS Performance on VMWare

A few weeks ago, I worked on setting up a Buffalo Terastation 3400 to store VMWare ESXi VM images.

For flexibility reasons, I wished to use NFS instead of iSCSI, however I discovered that performance was absolutely dismal. Initially, I was only getting 6MB/s write throughput via NFS on ESXi. However, mounting the same NFS mount from a Linux VM on the same ESXi instance, I would see 40MB/s!

After a couple of days of fruitless efforts and a call to Buffalo Tech Support, I finally found a solution.

1) Make sure the Terastation NFS is in kernel mode, otherwise it won’t work at all with ESXi.

2) Upgrade the firmware. Don’t believe the TS web GUI when it says its firmware is up-to-date.   Mine said it had the latest, however when Buffalo USA Tech Suppport sent me to their website, I found a much newer version available.

In my case, this upgrade boosted write performance from 6MB/s to 40MB/s.

3) Changing from RAID 5 to RAID 10 decreased my usable space, but boosted write throughput to approx 70MB/sec


Resize an IDE drive in VMWare VSphere using Linux

I needed to increase the size of a hard drive in a Windows XP VM on VMWare VSphere ESXi 5, but discovered that VSphere does not support resizing IDE drives.

While it is possible to convert the drive to SCSI and then resize, that creates may render the drive un-bootable due to SCSI device drivers on XP.

I discovered an easier way, assuming you have a Linux VM available:

  1. Prepare XP for resizing
  2. a) run chkdsk /f and restart. This cleans up any minor disk corruption that may interfere with later steps.
    b) Stop your VM, then edit your XP VM settings. Add a new, larger drive to your VM. Choose “IDE” in advanced options. (If the VM is not stopped, you won’t see IDE as a choice)

  3. Temporarily give the drives to the Linux VM
  4. a) With XP stopped, edit the Linux VM to add two new drives, using the EXISTING XP drive images.
    b) As root on the linux box, run dmesg. You should see the new drives like this:


    [1087836.865331] vmw_pvscsi: msg: device added at scsi0:1:0
    [1087836.867284] scsi 2:0:1:0: Direct-Access VMware Virtual disk 1.0 PQ: 0 ANSI: 2
    [1087836.870663] sd 2:0:1:0: Attached scsi generic sg2 type 0
    [1087836.870904] sd 2:0:1:0: [sdb] 33554432 512-byte logical blocks: (17.1 GB/16.0 GiB)
    [1087885.031428] vmw_pvscsi: msg type: 0x0 - MSG RING: 6/5 (5)
    [1087885.031435] vmw_pvscsi: msg: device added at scsi0:2:0
    [1087885.031612] scsi 2:0:2:0: Direct-Access VMware Virtual disk 1.0 PQ: 0 ANSI: 2
    [1087885.031829] sd 2:0:2:0: [sdc] 16777216 512-byte logical blocks: (8.58 GB/8.00 GiB)

    You can see here that sdb is the new 16 gig drive, and sdc is the 8 gig drive.

  5. Use linux to migrate data and repartition
  6. a) as root on the linux box, run:
    dd if=/dev/sdX of=/dev/sdY &
    where X is the drive letter of your old drive, and Y is the drive letter of your new drive.
    BE CAREFUL NOT TO CONFUSE DRIVE LETTERS or you WILL destroy your data.

    b) You can check your progress periodically via:
    # pkill -USR1 dd
    465913+0 records in
    465913+0 records out
    238547456 bytes (239 MB) copied, 6.09248 s, 39.2 MB/s

    c) run gparted /dev/sdY to repartition your drive. Right-click resize, then click apply. (This step may fail if you skipped step 1a…)

  7. Finalize VM configuration
  8. a) Edit your Linux VM one last time, removing both XP drives
    b) Edit your XP VM and remove the old drive. Make sure the new drive is listed in IDE slot 0:0

  9. Restart windows
  10. a) Power up your XP VM. Say yes when Windows prompts you to reboot due to system updates.
    b) That’s it!